Togomak
Welcome to Togomak, your go-to solution for seamless Continuous Integration and Continuous Deployment (CICD) workflows. Togomak is an open-source, Golang-based CICD system tool that aims to make building and deploying your applications a breeze, no matter where you want to run them.
What is Togomak?
Togomak is designed to be an abstraction layer for multiple CICD systems, making it easy to run your builds anywhere. Whether you're developing on your local machine or using popular cloud-based platforms like Jenkins or Cloud Build, Togomak has got you covered.
Taking inspiration from Terraform's lifecycle-based system, Togomak offers a structured approach to managing your build processes. Think of it as GNU Make, but with the added power of working across different environments.
togomak doesn't aim to be a competitor to other CI/CD systems like GitHub Actions or Jenkins, but in fact extend on them, helping to create a unified place to track builds across all infrastructure, and to make local developers' build and deployment process much easier. Think of it like this: you are an engineer, and having to deal with pipelines spread across GitLab, GitHub or Jenkins is such a pain. And sometimes, you just want to give a shot checking out the fix for a small typo you made, and now you have to wait for an eternity for the CICD pipelines to be green before you can actually test it on your system, because sometimes, development environments get too complicated, and the Cloud would be the ONLY place where the code actually works. Togomak, tries to unify them.
Get Started
Ready to simplify your CICD workflows? Follow our detailed installation guide to get Togomak up and running. Explore our documentation to learn more about its features, configuration options, and best practices.
Key Features
Flexibility and Extensibility
Togomak supports IPC-based plugins, allowing you to enhance its functionality using Golang or Python. With this capability, you can customize and extend Togomak to suit your specific needs, making it a truly versatile tool for your CICD build systems. Leveraging the power of hashicorp/go-plugin, the same plugin system used by Terraform, Togomak offers extensive configuration capabilities for your CICD build systems. Customize and fine-tune your workflows with ease using this robust and battle-tested plugin system.
Declarative Configuration
Forget complex configuration setups! Togomak uses a declarative HCL file to define your builds. This makes it straightforward to specify your requirements, ensuring a smooth and hassle-free configuration process. You can now even write your own parsers in any of your favorite languages to write a complex CICD pipeline now.
Local Runner System
Togomak's local runner system is designed to run anywhere. You can detach it and execute your builds in your preferred environment, providing the flexibility and convenience you need as a developer. Say goodbye to limitations and run your builds wherever you choose.
Remote Tracking System
NOTE: this section is planned, and is on the roadmap. See Roadmap
Collaboration made easy! Togomak includes a remote tracking server that securely stores your build logs and triggers builds through a user-friendly UI. Now you can share your build progress and collaborate with ease, whether you're working locally or on the cloud.
What's with the name?
Togomak is a playful fusion of "tokamak" and "to go and make." "Tokamak" refers to a magnetic plasma holding device used in fusion reactors, symbolizing Togomak's aim to provide a solid framework for managing CICD processes. The implementation of Togomak in Golang represents the "to go and make" aspect, leveraging Golang's simplicity, performance, and concurrency to deliver a powerful and efficient solution for your CICD requirements. Together, these elements embody Togomak's commitment to stability, adaptability, and productivity in the world of CICD.
Okay, that's a lot of talk. How do you pronounce it-
toh-goh-mak.
For the geeky users out there, Togomak is pronounced as "/toʊˈɡoʊˌmæk/."
Contribute
Togomak is an open-source project and welcomes contributions from the community. If you have ideas for new features, bug fixes, or improvements, we'd love to hear from you! Check out our contribution guidelines to learn how you can get involved.
Features
Concurrency
Togomak uses concurrency, by default. The number of stages run in parallel, is theoritically infinity (see goroutines). The number of stages run in parallel depends on the graph derived from the pipeline.
Say, four stages are completely independent of each of other. The number of stages run concurrently would be 4. Similarly, if stage A runs independently, but B, C, D depends on A, the maximum number of stages that will run in parallel would be 3.
When togomak -n or togomak --dry-run is used, concurrency
is disabled, so that the command output remains readable.
Dependency Resolution
togomak uses native dependency resolution, based on references within their attributes. Let's take a look at this example:
stage "alice" {
    script = "echo hello world"
}

stage "bob" {
    script = "echo waiting for ${stage.alice.id}"
}
In the above example, stage.alice naturally becomes a dependency of stage.bob.
However, you can also explicitly specify dependencies if you would like to:
stage "alice" {
    script = "hello world"
}

stage "bob" {
    depends_on = [stage.alice]
    script = "hello bob"
}
Data evaluation
Data blocks are lazily evaluated. Data blocks will be only evaluated before the stage requiring them, gets executed.
stage "bob" {
    script = "echo Hello World"
}

data "env" "bob_name" {
    default = "Bob Ross"
}

stage "alice" {
        script = "echo This is an environment variable: ${data.env.bob_name.value}"
}
In the above example, the order of execution would be stage.bob and env.bob_name in parallel, and then stage.alice.
If you would like to disable concurrency, and let all the execution happen synchronously and linearly,
you can disable concurrency on togomak.pipeline.concurrency options.
Interpolation
String interpolation is a native feature of togomak. It uses similarly named functions from Terraform, and has a lot of helper scripts to achieve the same.
Let's take an example:
stage "hello_world" {
    script = "echo ${upper('hello world')}"
}
The above stage prints HELLO WORLD to standard output, thanks to the upper
helper function.
Similarly, you can even do math!
stage "i_can_calculate" {
    script = "echo 1 plus 2 is ${1 + 2}"
}
For an incomplete list of functions, take a look at the detailed functions page.
Reusable Stages
Sometimes, you might have run into a scenario where you would like to repeat the same boring task multiple times in the same pipeline.
Your first thought might be a shell script, with custom arguments as parameters, but maintaining these pipelines over multiple places would be a hassle. A single pipeline is already complicated enough in my opinion.
togomak provides a feature called macros which are re-usable stages.
You can write a stage once, with a set of parameters, and re-use them
in multiple stages later. Let's see how:
togomak {
version = 2
}
macro "explode" {
stage "explode" {
script = <<-EOT
for i in $(seq 1 10); do
sleep 0.1
echo "${param.eva}: Loading $i..."
done
echo "${param.eva}: entry plug connected! pilot ${param.pilot} synchronized! 🤖"
EOT
}
}
stage "entry_plug_eva01" {
use {
macro = macro.explode
parameters = {
pilot = "Shinji Ikari 🙅♂️"
eva = "01"
}
}
}
stage "entry_plug_eva02" {
use {
macro = macro.explode
parameters = {
pilot = "Asuka Langley Soryu 🙅♀️"
eva = "02"
}
}
}
Daemonizing
Sometimes, you might want to run a stage in the background, for example,
an HTTP API server, and continue with multiple integrations tests on
the same HTTP API server. In another scenario, you might just want
two live reloading servers for two frontends running in parallel.
Or, maybe you just need a postgres database docker container running.
In these cases, togomak takes care of all the process management
required for handling these daemon-like long-running process.
Here is a sample use case, directly from togomak's togomak.hcl
togomak {
  version = 2
}


stage "fmt" {
  script = "go fmt github.com/srevinsaju/togomak/v1/..."
}

stage "vet" {
  script = "go vet github.com/srevinsaju/togomak/v1/..."
}

stage "build" {
  depends_on = [stage.fmt, stage.vet]
  script     = "go build -v -o ./cmd/togomak/togomak github.com/srevinsaju/togomak/v1/cmd/togomak"
}

stage "install" {
  depends_on = [stage.build]
  script     = "go install github.com/srevinsaju/togomak/v1/cmd/togomak"
}

stage "docs_serve" {
  daemon {
    enabled = true
  }
  if     = false
  script = "cd docs && mdbook serve"
}
In the above togomak configuration file, the mdbook generator, which
is used for writing this documentation is allowed to run as a daemon
process. Similarly, it is possible to have multiple processes running
as well.
Container Support
podmanexecution engine is not supported.togomakuses thedocker/clientSDK to directly interact with the running docker daemon.
Togomak has integrated docker container support, a sample usage would be as follows:
togomak {
  version = 2
}

stage "example" {
  container {
    image = "ubuntu"
    volume {
      source      = "${cwd}/diary"
      destination = "/newdiary"
    }
  }
  script = <<-EOT
  #!/usr/bin/env bash
  ls -al
  for i in $(seq 1 10); do
    sleep 1
    echo "Loading $i..."
  done
  cat rei.diary.txt
  ls -al /newdiary
  EOT
}
Outputs
Sometimes, you would want to generate some outputs from your build. Sometimes, you might want to store the version you parsed from a file, or a list of files that you would want to share with another independent stage.
To do so, you can write as environment variables to $TOGOMAK_OUTPUTS
for example:
togomak {
  version = 2
}

stage "agent" {
  script = <<-EOT
  set -u
  echo "AGENT=Ryoji Kaji" >> $TOGOMAK_OUTPUTS
  EOT
}

stage "seele" {
  depends_on = [stage.agent]
  name       = "seele"
  script     = "echo The agent from Seele reporting! ${output.AGENT}"
}
As a limitation, you can only share data within
the same pipeline scope. i.e, data is not
implicitly shared between pipelines run using
an remote source, or external file, in the case
of using macros with external files. However,
you can still pass them using macro's parameters.
Command Line Interface
Togomak, internally features three modes of execution:
ci(--ci)unattended(--unattended)- Normal execution
In unattended mode, all prompts and interactive options will be disabled.
ci mode is same as unattended mode, but however, a separate variable will
be defined in the pipeline togomak.ci, which can be used later to run
specific stages on CI, and only run certain stages on the user side.
The ci mode is implicit on popular CICD providers like Jenkins, GitHub or
GitLab CI, etc. It requires one of the environment variables: CI, TOGOMAK_CI
or the CLI flag --ci for it to be enabled.
In the normal execution mode, prompts will pass through the pipeline execution, and it will wait indefinitely until the user enters the value. Similarly, Interrupts will be enabled on the normal execution mode.
On the first Ctrl + C recevied from the user in the normal execution mode,
it will send SIGTERM to child stages, or will stop the docker container, in the
case of docker container engines. The deadline in most cases would be 10 seconds.
If a second Ctrl + C is received within the above deadline time, the child processes
will be sent SIGKILL signal. In the case of docker containers, no action will be
taken. This means that, it is possible that containers might be left dangling.
Similarly, it is possible to have zombie processes.
Usage
Basic Usage
By default, togomak runs all stages
which evaluates their condition stage.xxx.if to
true. By default, all stages evaluate their
condition to true, unless explicitly
specified.
To simply run all stages which meet the criteria, just do
togomak
and you should be good to go.
If your togomak pipeline lives in a different directory, you could:
togomak -C path/to/different/dir
Similary, you can also explicitly specify
the path to togomak.hcl using the -f or
the --file parameter.
Running specific stages
If you would like to run only specific stages, instead of the entire pipeline, you could do something like this:
togomak stage1 stage2
This would run both stage1, stage2 and
all the dependencies of stage1 and stage2.
That means, if there were a stage stage3
which depends on stage1, then stage3 would
also be included in the same pipeline.
Now, you can also blacklist and whitelist
certain stages. Let us take the specific
example of togomak.hcl which is used
to build togomak itself, at the root of
this repository:
togomak {
  version = 2
}


stage "fmt" {
  script = "go fmt github.com/srevinsaju/togomak/v1/..."
}

stage "vet" {
  script = "go vet github.com/srevinsaju/togomak/v1/..."
}

stage "build" {
  depends_on = [stage.fmt, stage.vet]
  script     = "go build -v -o ./cmd/togomak/togomak github.com/srevinsaju/togomak/v1/cmd/togomak"
}

stage "install" {
  depends_on = [stage.build]
  script     = "go install github.com/srevinsaju/togomak/v1/cmd/togomak"
}

stage "docs_serve" {
  daemon {
    enabled = true
  }
  if     = false
  script = "cd docs && mdbook serve"
}
In the above example, doing togomak build
would run both stage.build and stage.install.
However, if you would like to run only stage.build
and not stage.install, you could do:
togomak build ^install
The ^ operator is used as a blacklist operator.
Similarly, if you would like to add the stage.fmt
along with the stages which run, you would do:
togomak build ^install +fmt
Here, the + operator, is used as a whitelist operator.
You can add multiple +{stage_name} and ^{stage_name}
and togomak would run all the stages which meet the
criteria.
Running a specific stage alone
If you strictly want to run a single stage,
and do not want to include its dependencies,
or if you do not want to manually blacklist
all its dependencies, togomak has a
special stage called the root stage,
which will run regardless of the whitelist or the
blacklist.
So, if you would like to run only stage.build
and not stage.install, you could do:
togomak root +build
This translates to:
- Run only the
rootstage (and its dependencies, which arenil) - Whitelist
buildstage
Adding multiple whitelist and blacklist entries for the same stage will take no effect. The first entry will be considered and the rest will be ignored.
Whitlisting stages from a macro
If you would like to whitelist stages from a macro,
you could do so by using the + operator.
togomak macro_name.build
or
togomak macro_name.root +macro_name.build
and so on.
Daemonize stages
Experimental feature, use with caution.
If you would like to run a stage in the background,
you could do so by adding the & operator to the
stage name.
togomak &build
This would run the build stage in the background,
and will not wait for the build stage to complete
before moving on to the next stage. However,
the build stage will be terminated once the last
dependent of the build stage completes.
Under the hood, the build stage will receive
a SIGTERM signal, and will be given a grace period
of 10 seconds to complete. If the stage does not
terminate within the grace period, it will be
forcefully killed (SIGKILL).
The above feature is particularly useful for running long running stages, such as a docker service for performing integration tests.
For extensive information about the daemonizing feature, refer to the daemonizing section.
Configuration
Togomak
The togomak block is a mandatory
block for the file to be recognized as a valid
togomak pipeline.
# togomak.hcl

togomak {
    # ...
    version = 2
}
The above block, with version parameter
is required for any pipeline to be considered
"runnable".
Arguments Reference
version- The version of the Togomak pipeline file
Attributes Reference
version- The version of the Togomak runner executableboot_time- The time at which the Togomak runner executable was startedboot_time_unix- The time at which the Togomak runner executable was started, in unix formatpipeline_id- The unique identifier for the pipeline run (uuid)ci- Returnstrueif togomak is running on a CI environment, like GitHub Actions or Jenkins, etc.
Stage
A stage is considered as an atomic runnable
unit. Multiple stages may be executed
concurrently.
A stage can accept a script, a command and a set of arguments, or a macro.
Stage with Script
togomak {
  version = 2
}

stage "script" {
  script = "echo 'Hello World'"
}
Stage with Command and Arguments
togomak {
  version = 2
}

stage "command" {
  args = ["echo", "Hello World"]
}
Stage with Macro
togomak {
  version = 2
}

macro "echo" {
  stage "echo" {
    args = ["echo", "Hello World"]
  }
}

stage "macro" {
  use {
    macro = macro.echo
  }
}
Stage with Dependencies
togomak {
  version = 2
}

stage "build" {
  script = "echo 'Building'"
}

stage "install" {
  depends_on = [stage.build]
  script = "echo 'Installing'"
}
Stage with Retry
togomak {
  version = 2
}

stage "build" {
  script = <<-EOT
  echo this script will fail
  exit 1
  EOT
  retry {
    enabled = true
    attempts = 3
    exponential_backoff = true
    min_backoff = 1
    max_backoff = 10
  }
}
Stage with Containers
togomak {
  version = 2
}

stage "example" {
  container {
    image = "ubuntu"
    volume {
      source      = "${cwd}/diary"
      destination = "/newdiary"
    }
  }
  script = <<-EOT
  #!/usr/bin/env bash
  ls -al
  for i in $(seq 1 10); do
    sleep 1
    echo "Loading $i..."
  done
  cat rei.diary.txt
  ls -al /newdiary
  EOT
}
Arguments Reference
-
name- The name of the stage -
if- The condition to be evaluated before running the stage -
use- Macro, or a provider that could be used. Structure is documented below -
depends_on- The stages which this stage depends on. -
container- The container to be used to run the stage. Structure is documented below -
script- The script to be executed -
args- The command and arguments to be executed -
retry- Stage retry configuration. Structure is documented below -
daemon- Daemon specific configuration. Structure is documented below
macro- The macro to be used
enabled- Whether the stage should be retried, defaults tofalseattempts- The number of times the stage should be retriedexponential_backoff- Whether the backoff should be exponentialmin_backoff- The minimum backoff time (in seconds)max_backoff- The maximum backoff time (in seconds)
image- The container image to be used
Daemonization is still wip, see daemonization for more information on availability
The daemon block supports:
enabled- Whether the stage should be run as a daemon, defaults tofalsetimeout- Time to wait until the stage is terminated, in seconds. Defaults to 0 (no timeout).lifecycle- Set of rules which decide if the daemon needs to be terminated, or not. Structure documented below
- [
stop_when_complete] - Array of stages.togomakwaits for all the stages mentioned in thestop_when_completeargument, before sendingSIGTERMto the daemon process
Locals
If you plan to use a specific variable several times in your pipeline, you may use
a locals {} block.
A simple usage may be shown below
locals {
    var1 = 1
    var2 = "hello"
    var3 = {
        apple = 2
        orange = 3
    }
}
When referring to them in stages, use local.<variable_name>, for example:
togomak {
  version = 2
}

locals {
  nerv_headquarters = "Tokyo-3"
  pilot_name        = "Shinji"
}

stage "eva01_synchronization" {
  name   = "Eva-01 Synchronization Tests"
  script = "echo ${local.pilot_name} is now running synchronization tests at ${local.nerv_headquarters}"
}
Data
The data block allows fetching static data from different sources known
as data_providers. Common providers include examples like environment variables,
file sources, or an external secrets manager, like Hashicorp Vault or Google
Secret Manager.
A basic data block looks like this:
data "provider_name" "id" {
    ...
    default = "???"
}
Here, the data block uses the provider, provider_name to retrieve information.
The retrieved value will be stored, and can be accessed data.provider_name.id.value.
Data Providers
Built-in providers
Parameters for the data block depends on the type of the provider.
Supported buit-in providers are:
data.env: Environment Variable Providerdata.prompt: Interactive user CLI promptdata.file: Read data from a file
Refer to the documentation by the provider type, for more information on the supported attributes.
data.env
The env data provider fetches the variable from the environment
before the execution of the pipeline happens. If the specified
environment variable is undefined, falls back to the default
value specified in the data.env block, else returns an empty
string.
Reading an environment variable
data "env" "user" {
  key = "USER"
  default = "me"
}
Arguments Reference
key: The environment variable key which needs to be fetched fromos.environdefault: Fallback definition, which will be returned ifos.environ[key]is undefined.
Attributes Reference
- [
value]: The value from the environment variable defined inkey
data.prompt
If you interactively need to ask user for an input, you may use
the prompt data source.
The prompt data source interactively asks for the user
on the Command line interface, if the TTY supports it, or
asks the user on the Web UI (not implemented yet).
It is very likely that, depending on the execution engine,
data.prompt resources are placed at the beginning of the
topological sorted layer to prevent interference from other
running stages (in the case of CLIs), or in the case of
Web UIs to collect all data in the beginning of pipeline
execution, so that it can happen asynchronously.
Prompting a user for response
data "prompt" "name" {
    prompt = "what is your name?"
    default = "John Doe"
}
Argument Reference
prompt- The data that the user will be prompted for (optional)default- Fallback data which will be returned if the user did not enter anything, or if the TTY is absent, or if any other UI provider is missing. (optional)
Attributes Reference
value- The response from the user, otherwise thedefaultvalue will be returned.
data.git
The git data provider clones a git repository
to a specific directory
Opening the existing repository
data "git" "this" {
  url = "."
}
Cloning a new repository
togomak {
  version = 2
}

data "git" "repo" {
  url   = "https://github.com/srevinsaju/togomak"
  branch = "v1"
  files = ["togomak.hcl"]
}

stage "example" {
  name   = "example"
  script = <<-EOT
  echo '${data.git.repo.files["togomak.hcl"]}'
  EOT

}
Reusing remote stages, using togomak
togomak {
  version = 2
}

data "git" "eva01_source" {
  url   = "https://github.com/srevinsaju/togomak"
  files = ["togomak.hcl"]
}

macro "gendo_brain" {
  files = data.git.eva01_source.files
}

stage "build_eva01" {
  name = "Building eva unit"
  use {
    macro = macro.gendo_brain
  }

}
Arguments Reference
url- The URL of the repository to clone.tag- The tag to checkout.tagtakes precedence overbranch.ref- The reference to checkout, in the formatrefs/tags/v3for example.reftakes precedence overtagandbranch.branch- The branch to checkout.refandtagtakes precedence overbranch.destination- The destination directory to clone the repository to, defaults to"memory", which clones into a temporary directory managed bytogomakcommit- The commit to checkout.depth- The depth of the clone.ca_bundle- The path to a CA bundle file or directory, (deprecated, does nothing).auth- The authentication credentials to use when cloning the repository. Structure documented belowfiles- The files to checkout from the repository. Accepts an array of file paths.
Attributes Reference
last_tag- The latest tag in the repository, defaults to""commits_since_last_tag- The number of commits since the last tag, defaults to0sha- The SHA of the commit, defaults to""ref- The ref of the commit, in the formatrefs/heads/<branch>orrefs/tags/<tag>, defaults to""is_tag- Whether the ref is a tag, defaults tofalsefiles- The files checked out from the repository. Returns a map, with the keys being the file paths and the values being the file contents.branch- The branch checked out from the repository. Returns a string.destination- The destination where the repository is stored.
username- The username to be used. If password is specified, and if the username is empty, it falls back tooauth2password- The password to be used for connecting to the private repository.
Macro
Macros are reusable stages. If you would like to reuse the same stage multiple times
in the same pipeline, with optionally different parameters, macros are the right
thing for you.
You may use macro in three ways:
- Inline stages (
stageblock): The stage is defined in the macro block, and re-used multiple times - External files (
sourceargument): Path to an external single pipeline located on the filesystem, which will be passed to an internal togomak child process, which will independently run the single file as a separate stage. See Reusable Stages section for more information. - Pipeline content (
filesargument): A map containing files inline, which will be used by togomak, to create another child process which will run the contents of the file, as an independant stage.
Before you decide to use macro, you might be interested in seeeing
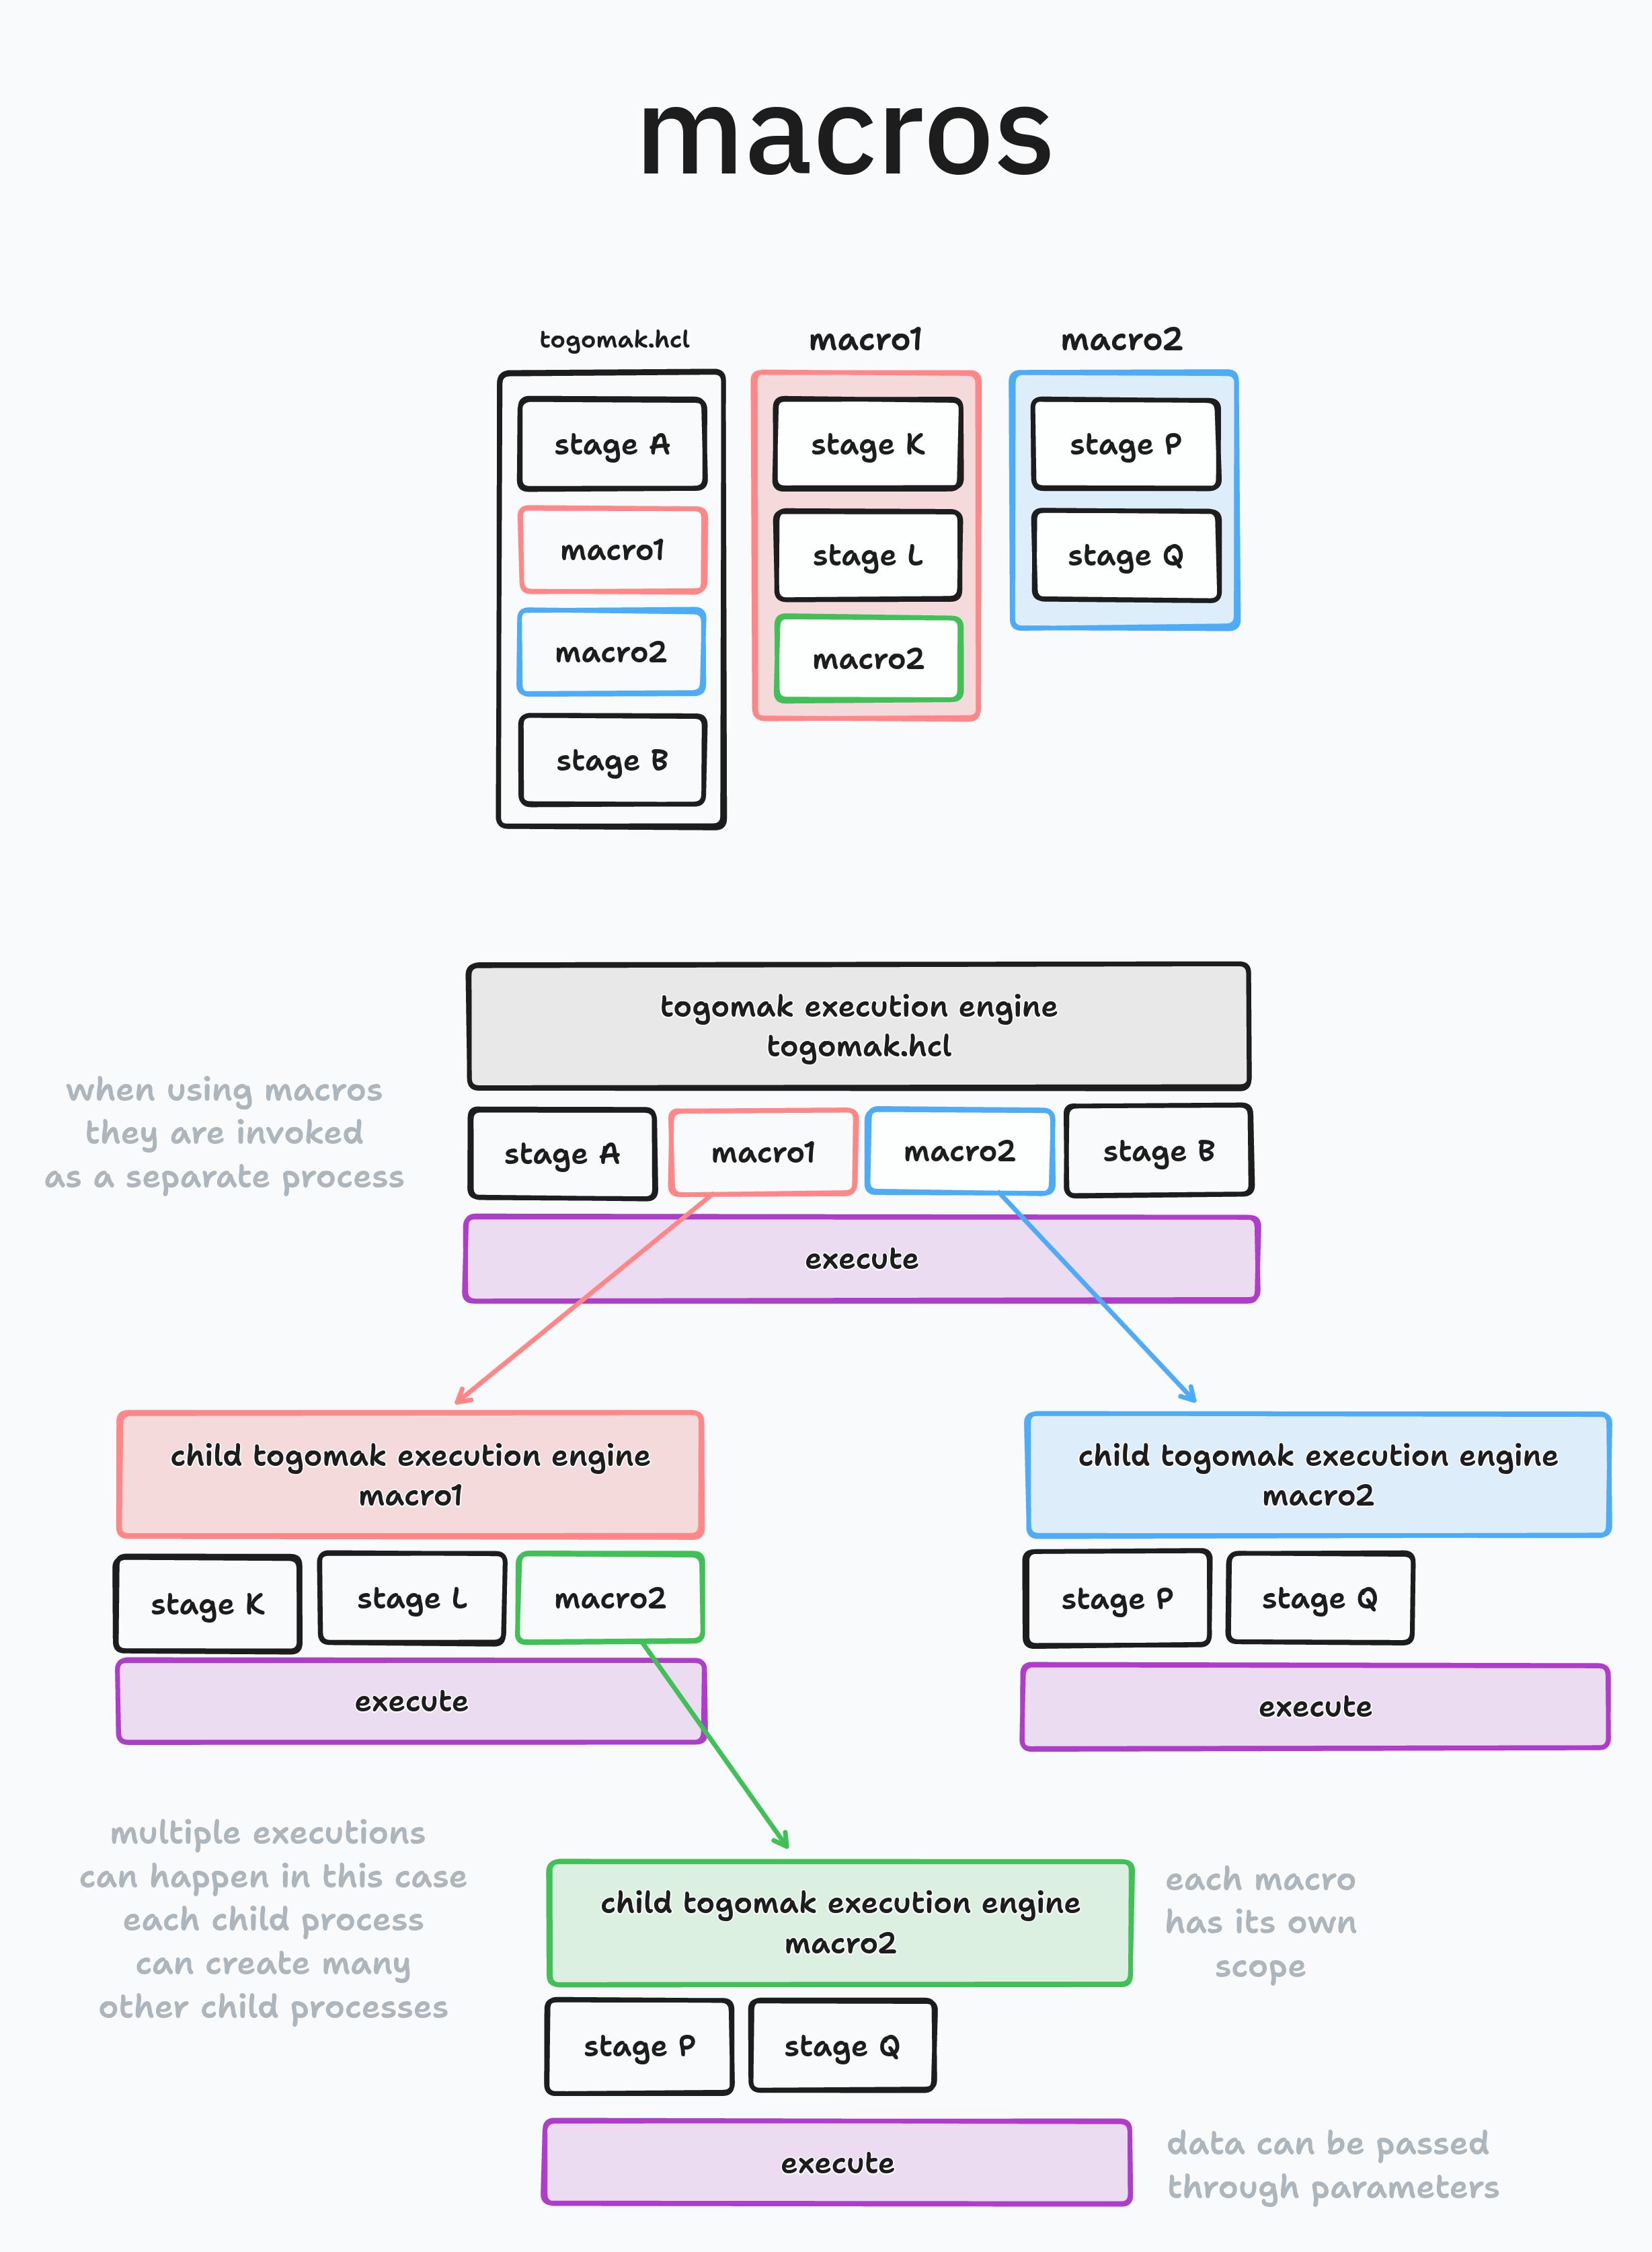
import block. See also What's the difference between macro and import?
Example usage (Inline stages)
togomak {
version = 2
}
macro "explode" {
stage "explode" {
script = <<-EOT
for i in $(seq 1 10); do
sleep 0.1
echo "${param.eva}: Loading $i..."
done
echo "${param.eva}: entry plug connected! pilot ${param.pilot} synchronized! 🤖"
EOT
}
}
stage "entry_plug_eva01" {
use {
macro = macro.explode
parameters = {
pilot = "Shinji Ikari 🙅♂️"
eva = "01"
}
}
}
stage "entry_plug_eva02" {
use {
macro = macro.explode
parameters = {
pilot = "Asuka Langley Soryu 🙅♀️"
eva = "02"
}
}
}
Argument reference
stage- The stage that will be reused, optional. Structure documented belowsource- Path to a different togomak file, which will be recursively invoked.files- a map containing key value pairs of file paths to file content. Map documented below
- All features under the
stage, exceptid,name,description
The files is a map, which accepts data in the format of key-value pairs, where the "key" is the path to the file
and the "value" is the content of the file.
For example,
files = {
    "togomak.hcl" = <<-EOT
    togomak {
        version = 2
    }
    stage "hello" {
        script = "echo hello world"
    }
    EOT,
    ...
}
Import
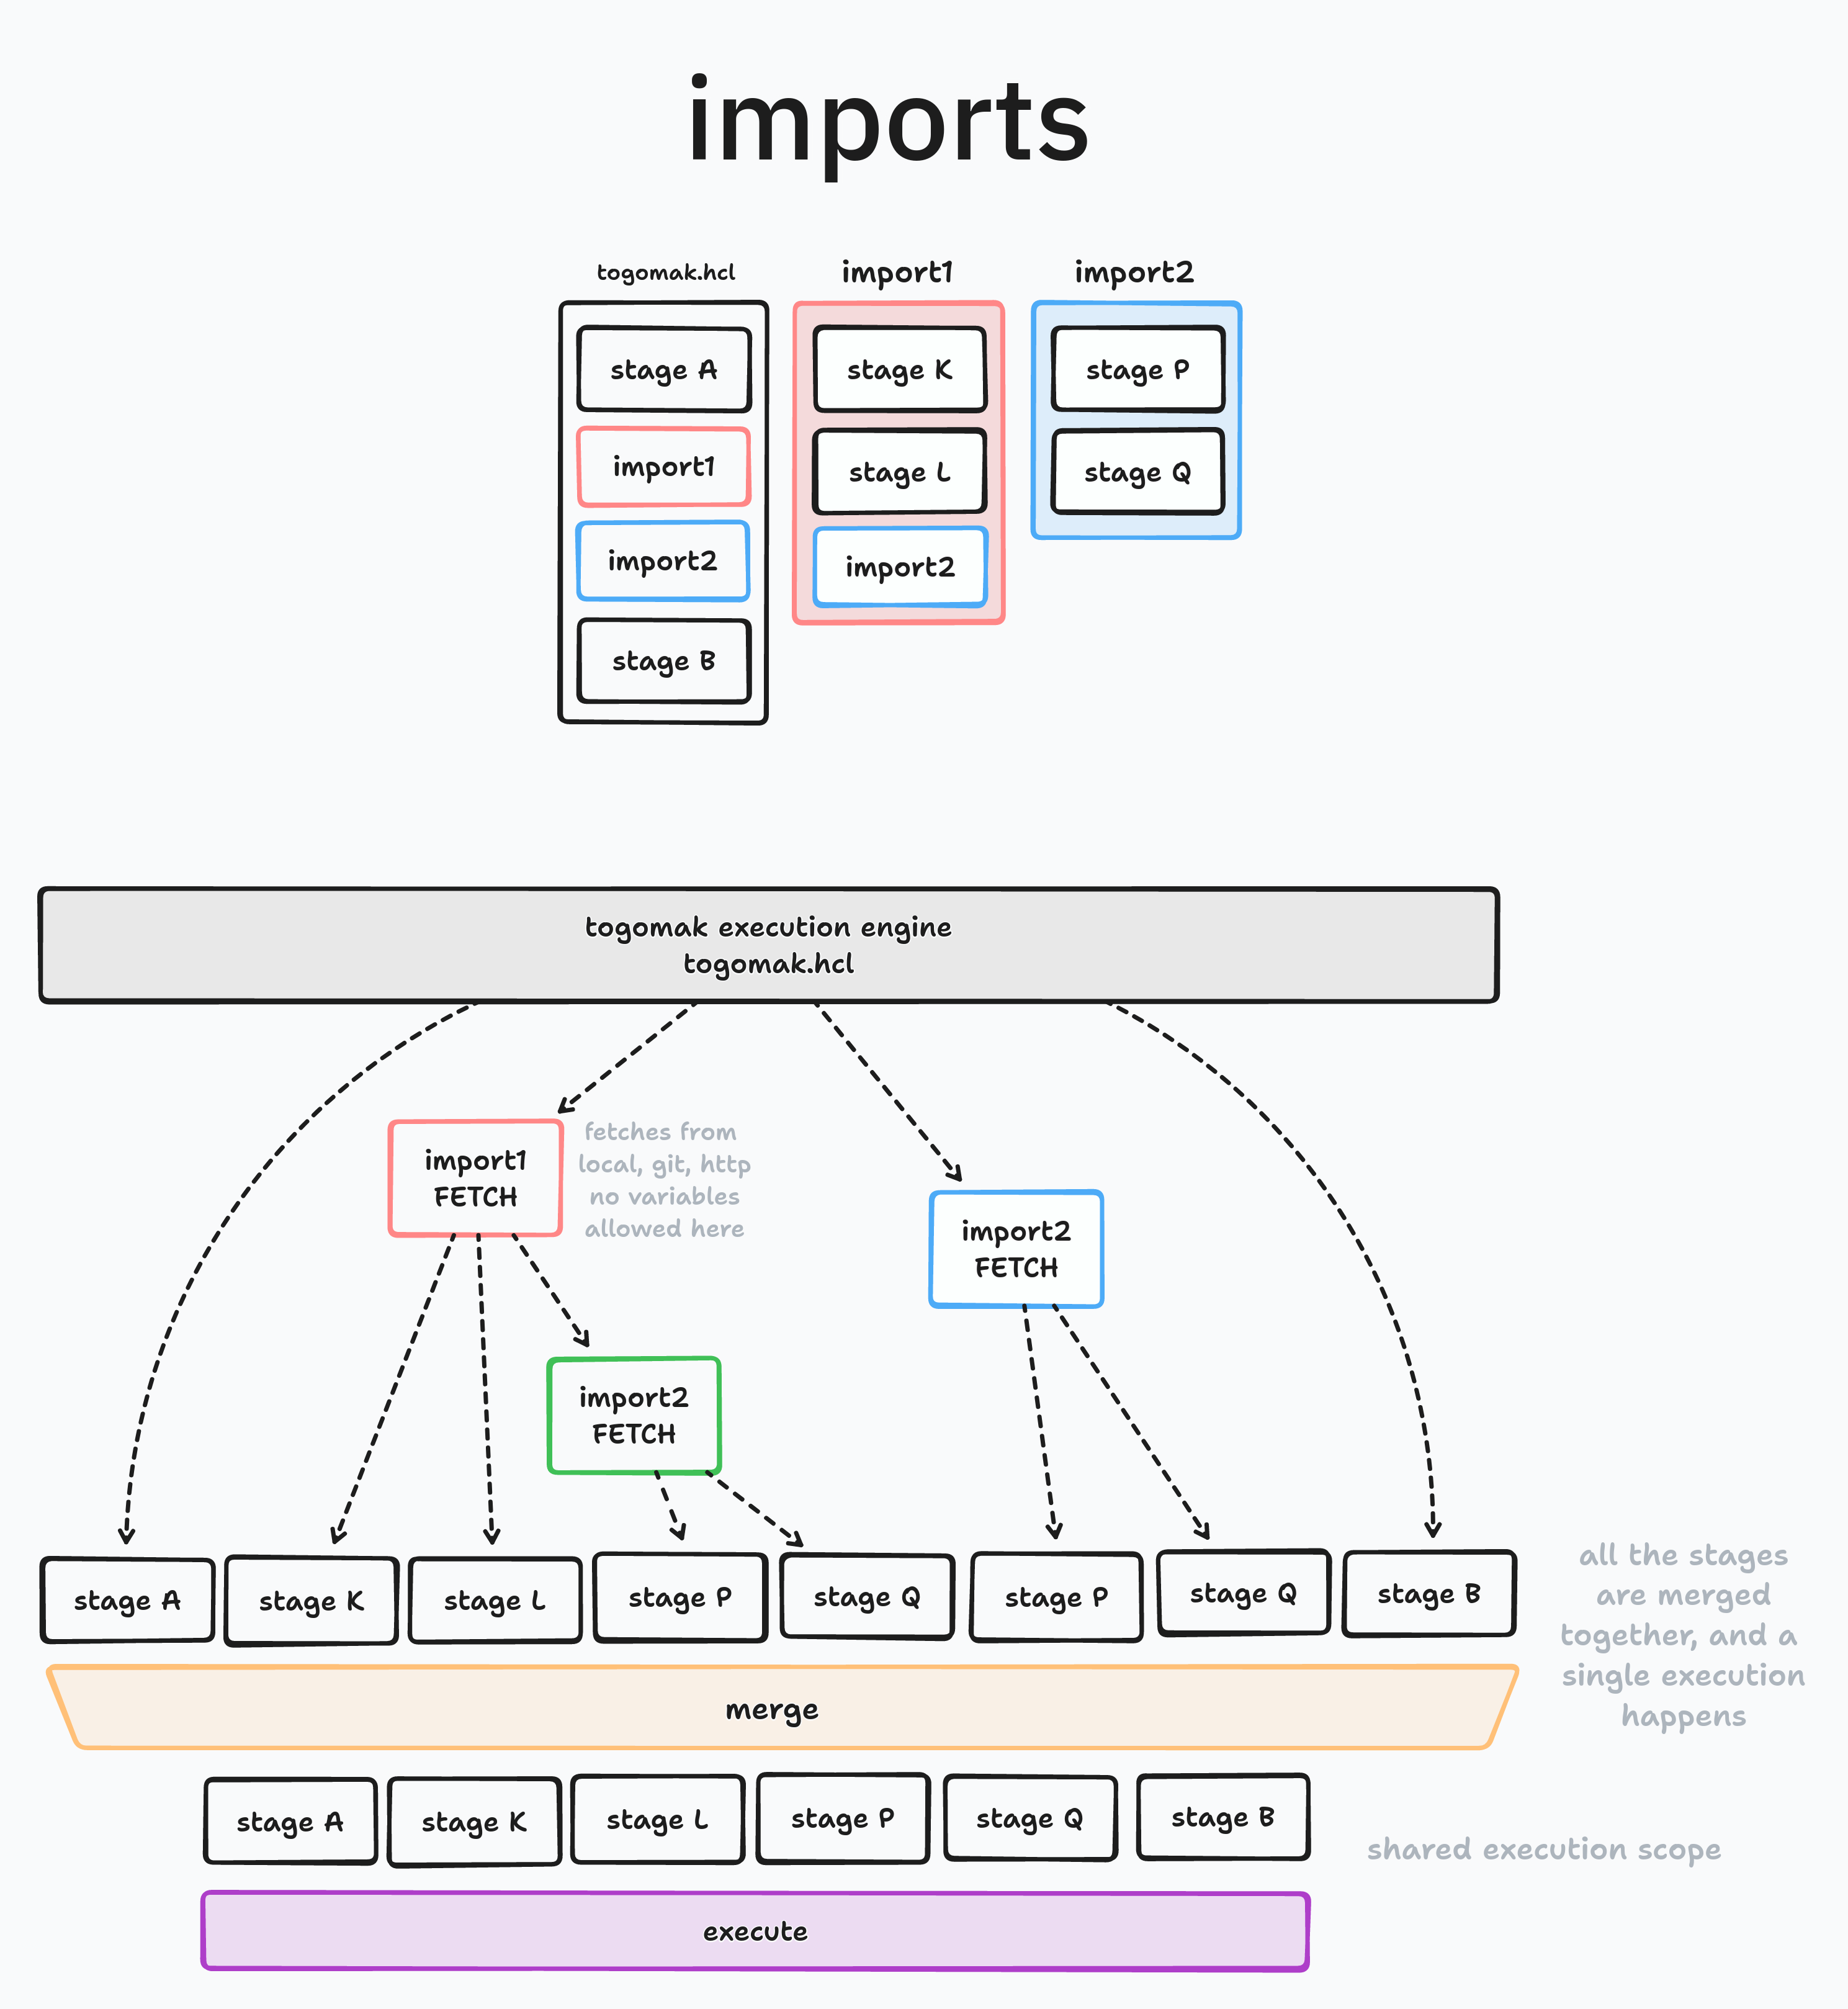
The import block allows you to merge multiple pipelines together,
into a flatter pipeline. import blocks are evaluated before the
dependency tree is generated, and hence, variables or expressions
are not permitted. If you need to statisfy a more dynamic evaluation,
use macro instead.
import block accepts a single parameter without any id. The block
specifies the source, which should be a constant value, and could
be a local file,
Example usage
togomak {
  version = 2
}

import {
  source = "./module"
}

stage "main" {
  script = "echo script from the main file"
}

import {
  source = "git::https://github.com/srevinsaju/togomak-first-module"
}
Argument reference
source- URL to fetch the pipeline from, could be local file path, relative file path, absolute file path, a Git URL, a HTTP URL, GCS bucket, AWS s3 bucket or mercurial.
The URL for source may be link to the required pipeline inclusive of the
protocol, or you may omit in certain cases, where detectors would
be run on top of it.
For example:
github.com/srevinsaju/togomakwould automatically evaluate to a SSH URL./file.hclwould evaluate a relative file in the Togomak current working directory.git::https://github.com/srevinsaju/togomak//examples/dockerwould specifically checkout theexamples/dockerfolder from the GitHub repositoryhttps://github.com/srevinsaju/togomak.gitoverhttpsusinggit.
Additionally, you may add query strings like ?ref=abcdefg to checkout a specific commit of the repository. Check out the documentation of the underlying library, go-getter which powers terraform modules here: hashicorp/go-getter
What's the difference between macro and import?
Great question, the following diagram may help you filter out the differences between them.
Plugins
Contributing
Contributions are welcome, and encouraged. All contributions are licensed under the MPL License v2.0
Table of Contents
- Contribution Workflow
- Commit Guidelines
- Documentation
- Code Formatting
- Testing
- Pull Requests
- Code of Conduct
- License
Contribution Workflow
- Fork the repository to your GitHub account.
- Clone the forked repository to your local machine.
- Create a new branch for your feature or bug fix:
git checkout -b feature-name. - Make your changes, following the project's coding style and guidelines.
- Commit your changes using Conventional Commit standards (see guidelines below).
- Push your branch to your forked repository:
git push origin feature-name. - Open a pull request against the main repository's
v1branch.
Commit Guidelines
We follow the Conventional Commit standard for our commit messages. This standard helps us maintain a clean and informative commit history. Each commit message should have the following format:
<type>: <description>

[optional body]

[optional footer]
Here are some examples of commit message types:
- feat: A new feature implementation.
- fix: A bug fix.
- docs: Documentation changes.
- refactor: Code refactoring.
- test: Adding or modifying tests.
- chore: General maintenance tasks (build system updates, dependency management, etc.).
Please make sure to provide a clear and concise description in the commit message. If additional information is necessary, feel free to include a body section or refer to relevant issues or pull requests.
Documentation
It is important to keep the project's documentation up-to-date. Any changes or additions made to the code should be reflected in the relevant documentation files. If you make any modifications that affect the project's usage or behavior, please update the documentation accordingly.
We use mdbook to generate the documentation.
You can start a live server to preview your changes by running mdbook serve in the docs directory, or
by using togomak root +docs_serve command.
Code Formatting
To maintain a consistent code style, please run go fmt on your Go code before committing. This command automatically formats your code according to the standard Go formatting guidelines.
Or just run togomak from time to time.
Testing
Before submitting your changes, please ensure that all existing tests pass and add new tests when appropriate. Running the test suite helps to verify the correctness and stability of the codebase.
Pull Requests
When submitting a pull request, please adhere to the following guidelines:
- Provide a clear and descriptive title for the pull request.
- Include a summary of the changes made and the motivation behind them.
- Reference any relevant issues or pull requests in the description.
- Make sure your code is properly formatted and documented.
- Verify that all tests pass successfully.
- Assign the pull request to the appropriate reviewer(s).
- Be prepared to address feedback and make any necessary changes.
Code of Conduct
Please note that by participating in this project, you are expected to abide by GitHub's Code of Conduct. Be respectful and considerate towards others, and help create a welcoming and inclusive environment for everyone involved.
License
By contributing to this project, you agree that your contributions will be licensed under the project's LICENSE.